- Prerequisites
- Installation Steps
- Authentication
- Troubleshooting
- Windows firewall settings
- Next steps
This guide explains how to install Trendz Analytics on Windows 10 or 11 (32-bit/64-bit).
Important note before proceeding with Windows installation
Certain Trendz Analytics features like predictions, metric explorations, and Python calculation fields require a Python executor.
The python executor runs only via Docker. Even on Windows, Docker is essential to fully utilize all Trendz features.
We recommend following the Docker (Windows) installation guide and using the Docker installation instead of Windows.
Proceed here only if you have a compelling reason to use a combined Windows + Docker setup.
Prerequisites
Hardware Requirements
Depends on the amount of analyzed data and the number of devices connected to the system. To run Trendz Analytics on a single machine, you will need at least 1Gb of free RAM.
In small and medium installations, Trendz can be installed on the same server with ThingsBoard.
Software Requirements
- Have Docker CE. You can find out how to install it here
-
Have Docker Compose. You can find out how to install it here
- ThingsBoard version 4.3.0 or newer. In case you have ThingsBoard version 4.2.1 or older, you could connect Trendz to ThingsBoard following the next guide.
- Active Trendz Analytics addon. To find out how to activate it, please follow the next guide.
Installation Steps
Step 1. Install Java 17 (OpenJDK)
ThingsBoard service is running on Java 17. Follow this instructions to install OpenJDK 17.
- Visit Open JDK Download Page. Go to “Other platforms and versions”, select “Operating System” as “Windows”, “Architecture” as “x64”, “Version” as “17 - LTS” and download JDK .msi package.
- Run the downloaded MSI package and follow the instructions. Make sure you have selected “Add to PATH” and “Set JAVA_HOME variable” options to “Will be installed on local hard drive” state.
- Visit PostgreSQL JDBC Download Page to download PostgreSQL JDBC Driver. Choose the latest available option.
- Create the folder C:\Program Files\JDBC and copy downloaded file there. Then, add a new global variable - run PowerShell as an administrator and execute the following command. Do not forget to change “postgresql-42.2.18.jar” in the command to match the downloaded version.
1
[System.Environment]::SetEnvironmentVariable("CLASSPATH", '.;"C:\Program Files\JDBC\postgresql-42.2.18.jar"', [System.EnvironmentVariableTarget]::Machine)
You can check the installation using the following command (using Command Prompt):
1
java -version
Expected command output is:
1
2
3
4
C:\Users\User>java -version
openjdk version "17.x.xx"
OpenJDK Runtime Environment Temurin-17.x.xx (...)
OpenJDK 64-Bit Server VM Temurin-17.x.xx (...)
Step 2. Trendz Analytics service installation
Download and extract the package.
1
https://dist.thingsboard.io/trendz-windows-1.15.0.4.zip
Note: We assume you have extracted Trendz package to default location: C:\Program Files (x86)\trendz
Step 3. Configure Trendz database
Trendz uses PostgreSQL as a database. You can install PostgreSQL on the same serverfor Trendz or use managed PostgreSQL service from your cloud vendor.
- PostgreSQL Installation
Download the installation file (PostgreSQL 12.17 or newer releases) here and follow the installation instructions.
During PostgreSQL installation, you will be prompted for superuser (postgres) password. Don’t forget this password. It will be used later. For simplicity, we will substitute it with “postgres”.
- Create Database for Trendz
Once installed, launch the “pgAdmin” software and login as superuser (postgres). Open your server and create database “trendz” with owner “postgres”.
- Configure database connection for Trendz
Open the Notepad or other editor as administrator user (right click on the app icon and select “Run as administrator”).
Open the following file for editing (select “All Files” instead of “Text Documents” in file choosing dialog, the encoding is UTF-8):
1
C:\Program Files (x86)\trendz\conf\trendz.yml
and locate “datasource” block. Replace SPRING_DATASOURCE_URL, SPRING_DATASOURCE_USERNAME and SPRING_DATASOURCE_PASSWORD properties with valid values. Don’t forget to replace “postgres” with your real postgres user password:
1
2
3
4
5
6
7
datasource:
    driverClassName: "${SPRING_DRIVER_CLASS_NAME:org.postgresql.Driver}"
    url: "${SPRING_DATASOURCE_URL:jdbc:postgresql://localhost:5432/trendz}"
    username: "${SPRING_DATASOURCE_USERNAME:postgres}"
    password: "${SPRING_DATASOURCE_PASSWORD:postgres}"
    hikari:
      maximumPoolSize: "${SPRING_DATASOURCE_MAXIMUM_POOL_SIZE:5}"
Step 4. Run installation script
Launch windows shell (Command Prompt) as Administrator. Change directory to your Trendz installation directory.
Execute install.bat script to install Trendz as a Windows service. This means it will be automatically started on system startup. Similar, uninstall.bat will remove Trendz from Windows services. The output should be similar to this one:
1
2
3
4
5
6
7
C:\Program Files (x86)\trendz>install.bat
Detecting Java version installed.
CurrentVersion 11
Java 11 found!
Installing Trendz Analytics...
...
Trendz Analytics installed successfully!
Step 5. Start Trendz service
Now let’s start the Trendz service! Open the command prompt as an Administrator and execute the following command:
1
net start trendz
Expected output:
1
2
The Trendz Analytics service is starting.
The Trendz Analytics service was started successfully.
In order to restart the Trendz service you can execute following commands:
1
2
net stop trendz
net start trendz
Step 6. Sync ThingsBoard With Trendz
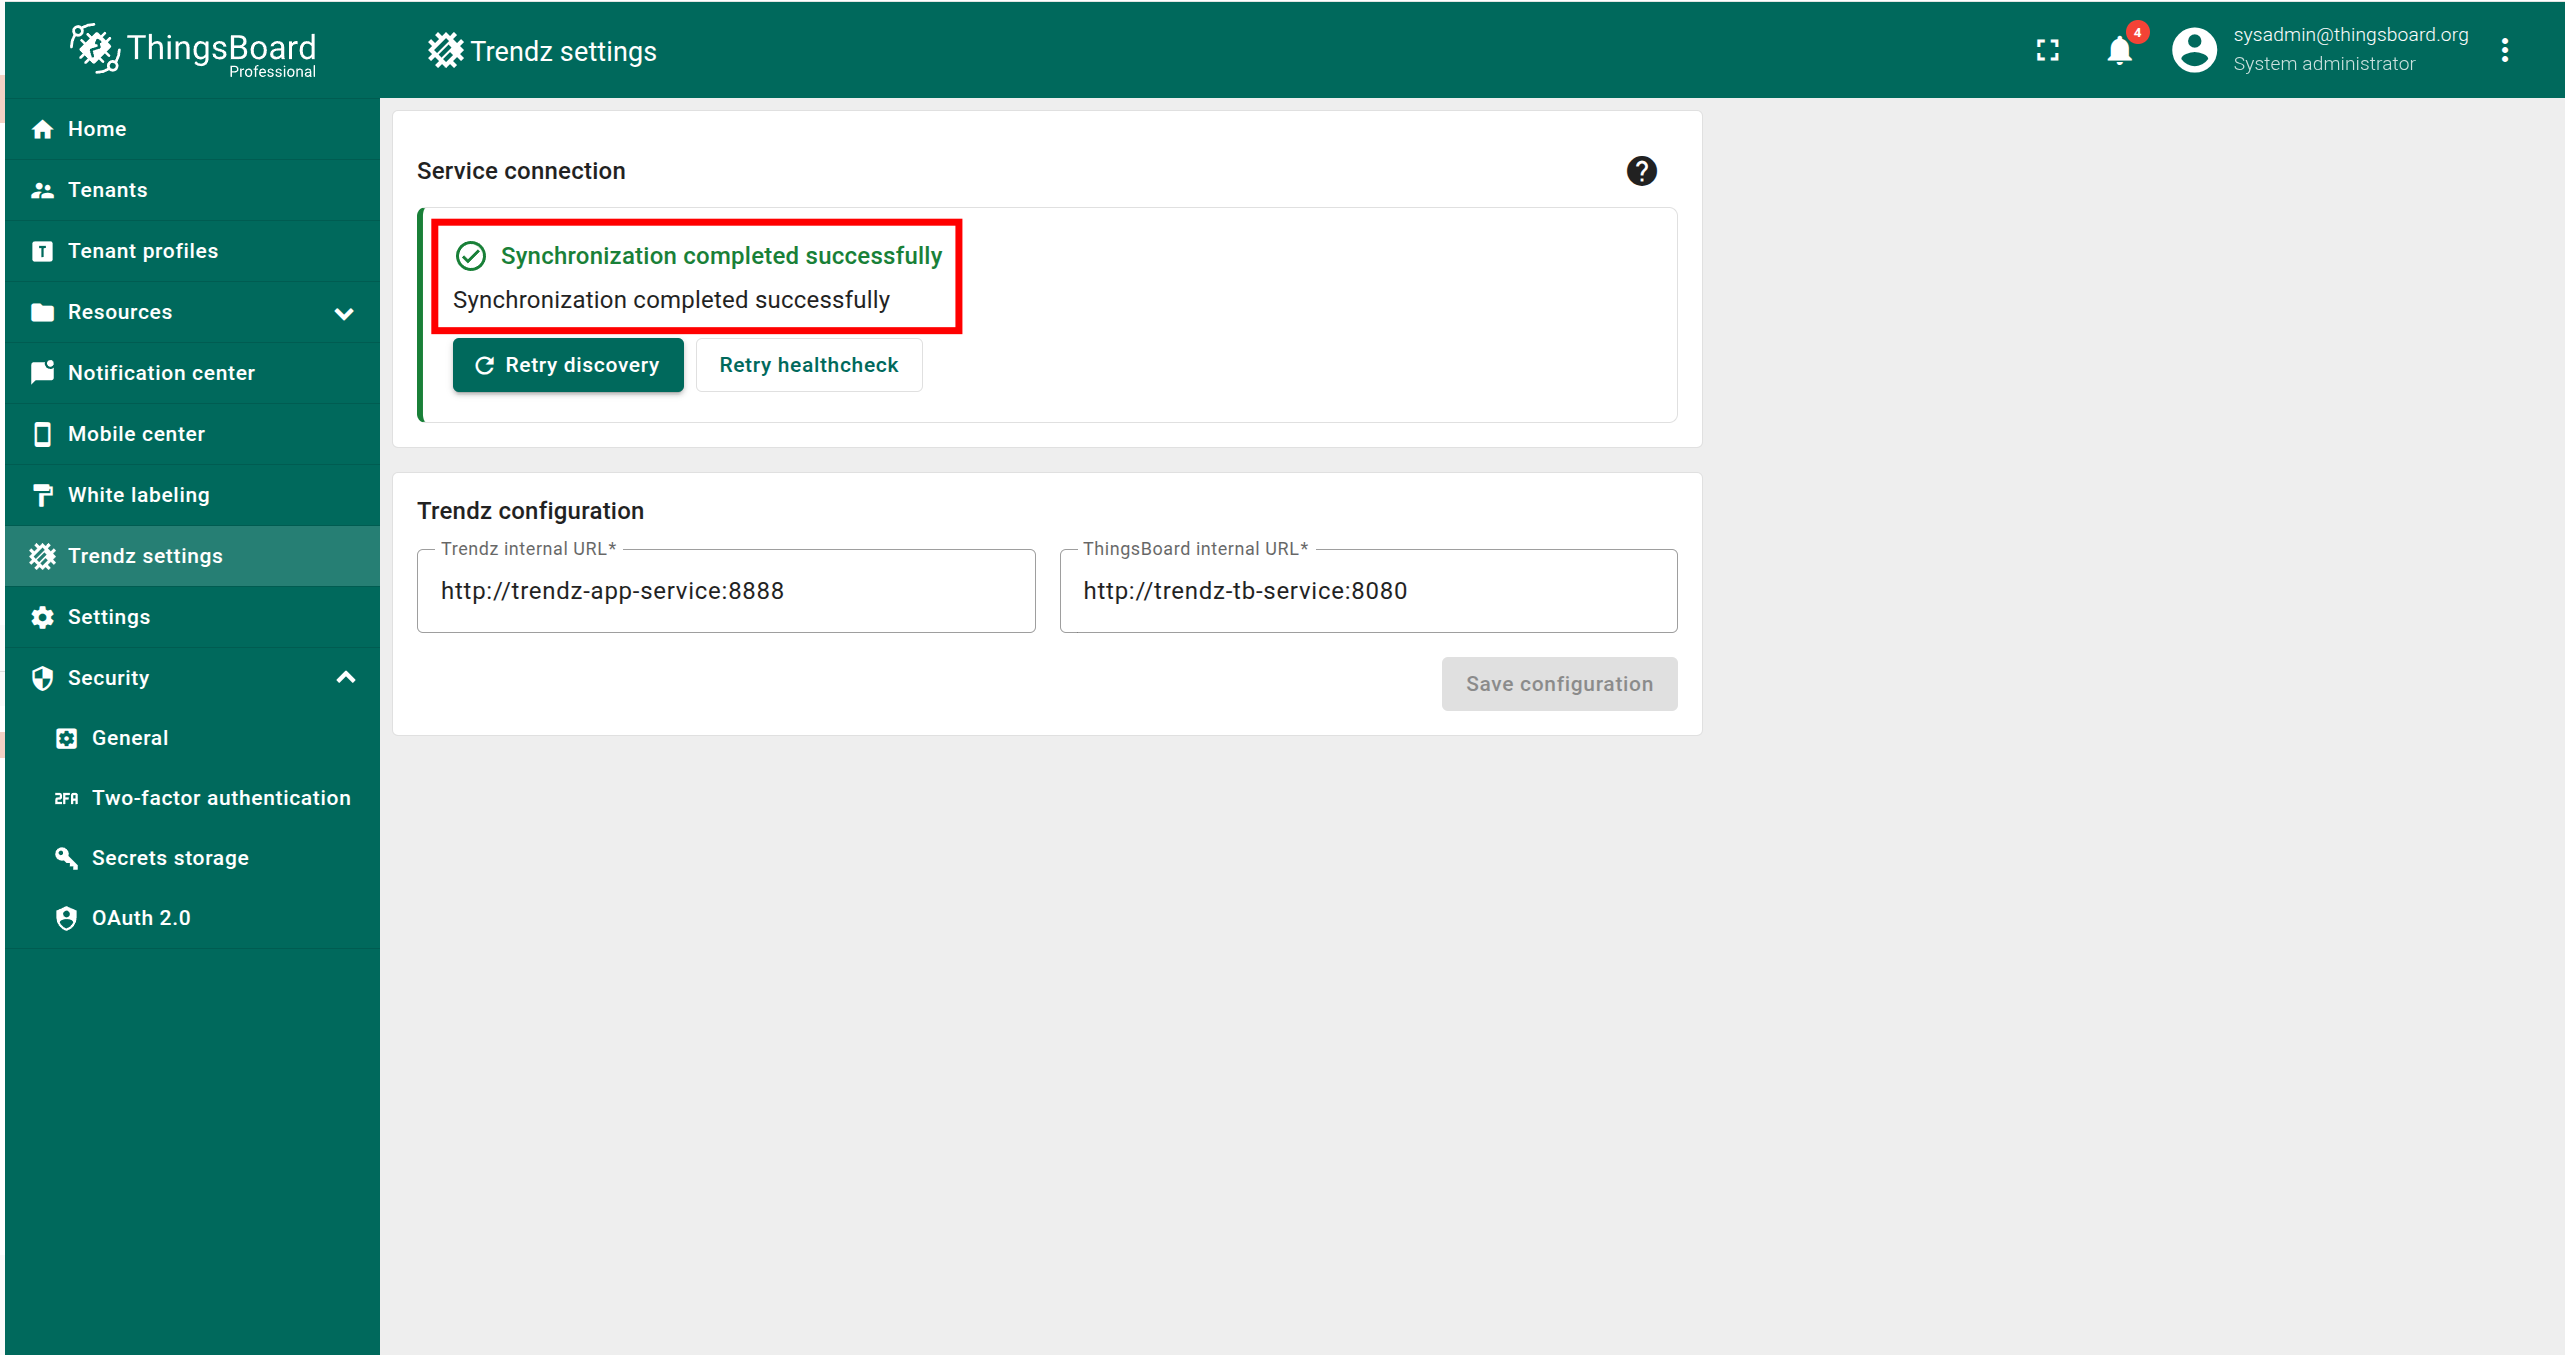
The final step is to verify that ThingsBoard is synchronized with Trendz. To do this:
- Log in to ThingsBoard as a Sysadmin.
- Open the Trendz Settings page.
If you see the message “Synchronization completed successfully”, the synchronization has been completed automatically and no further action is required.

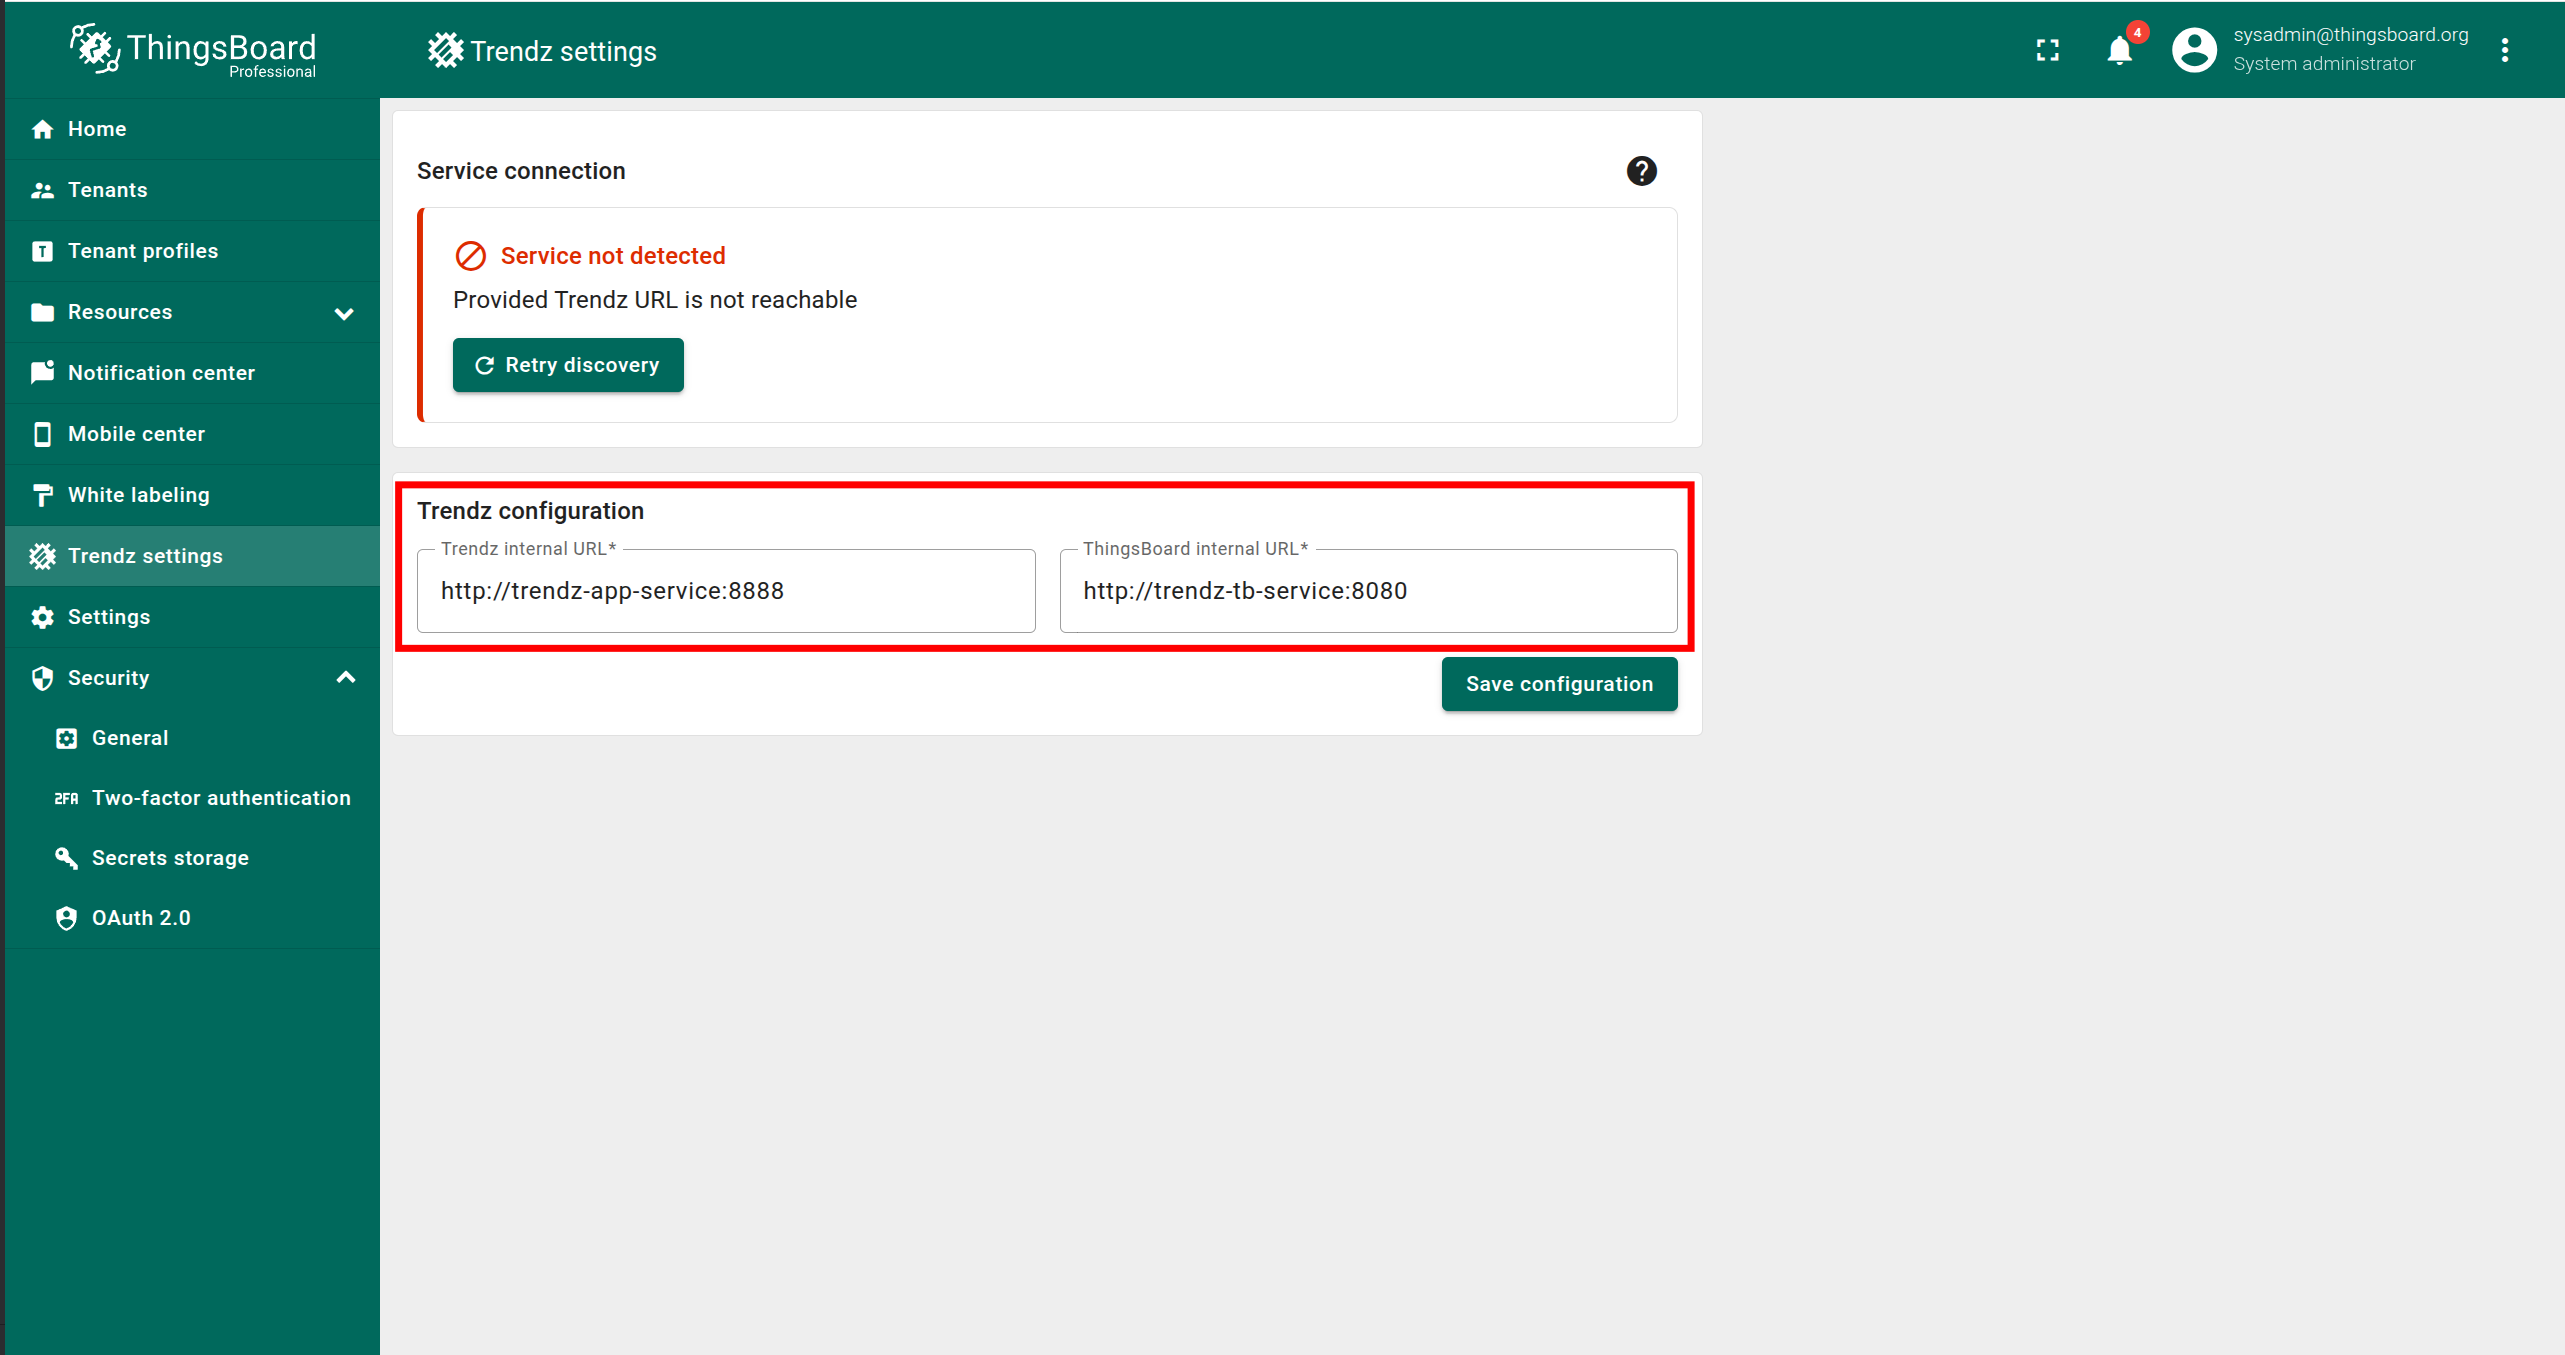
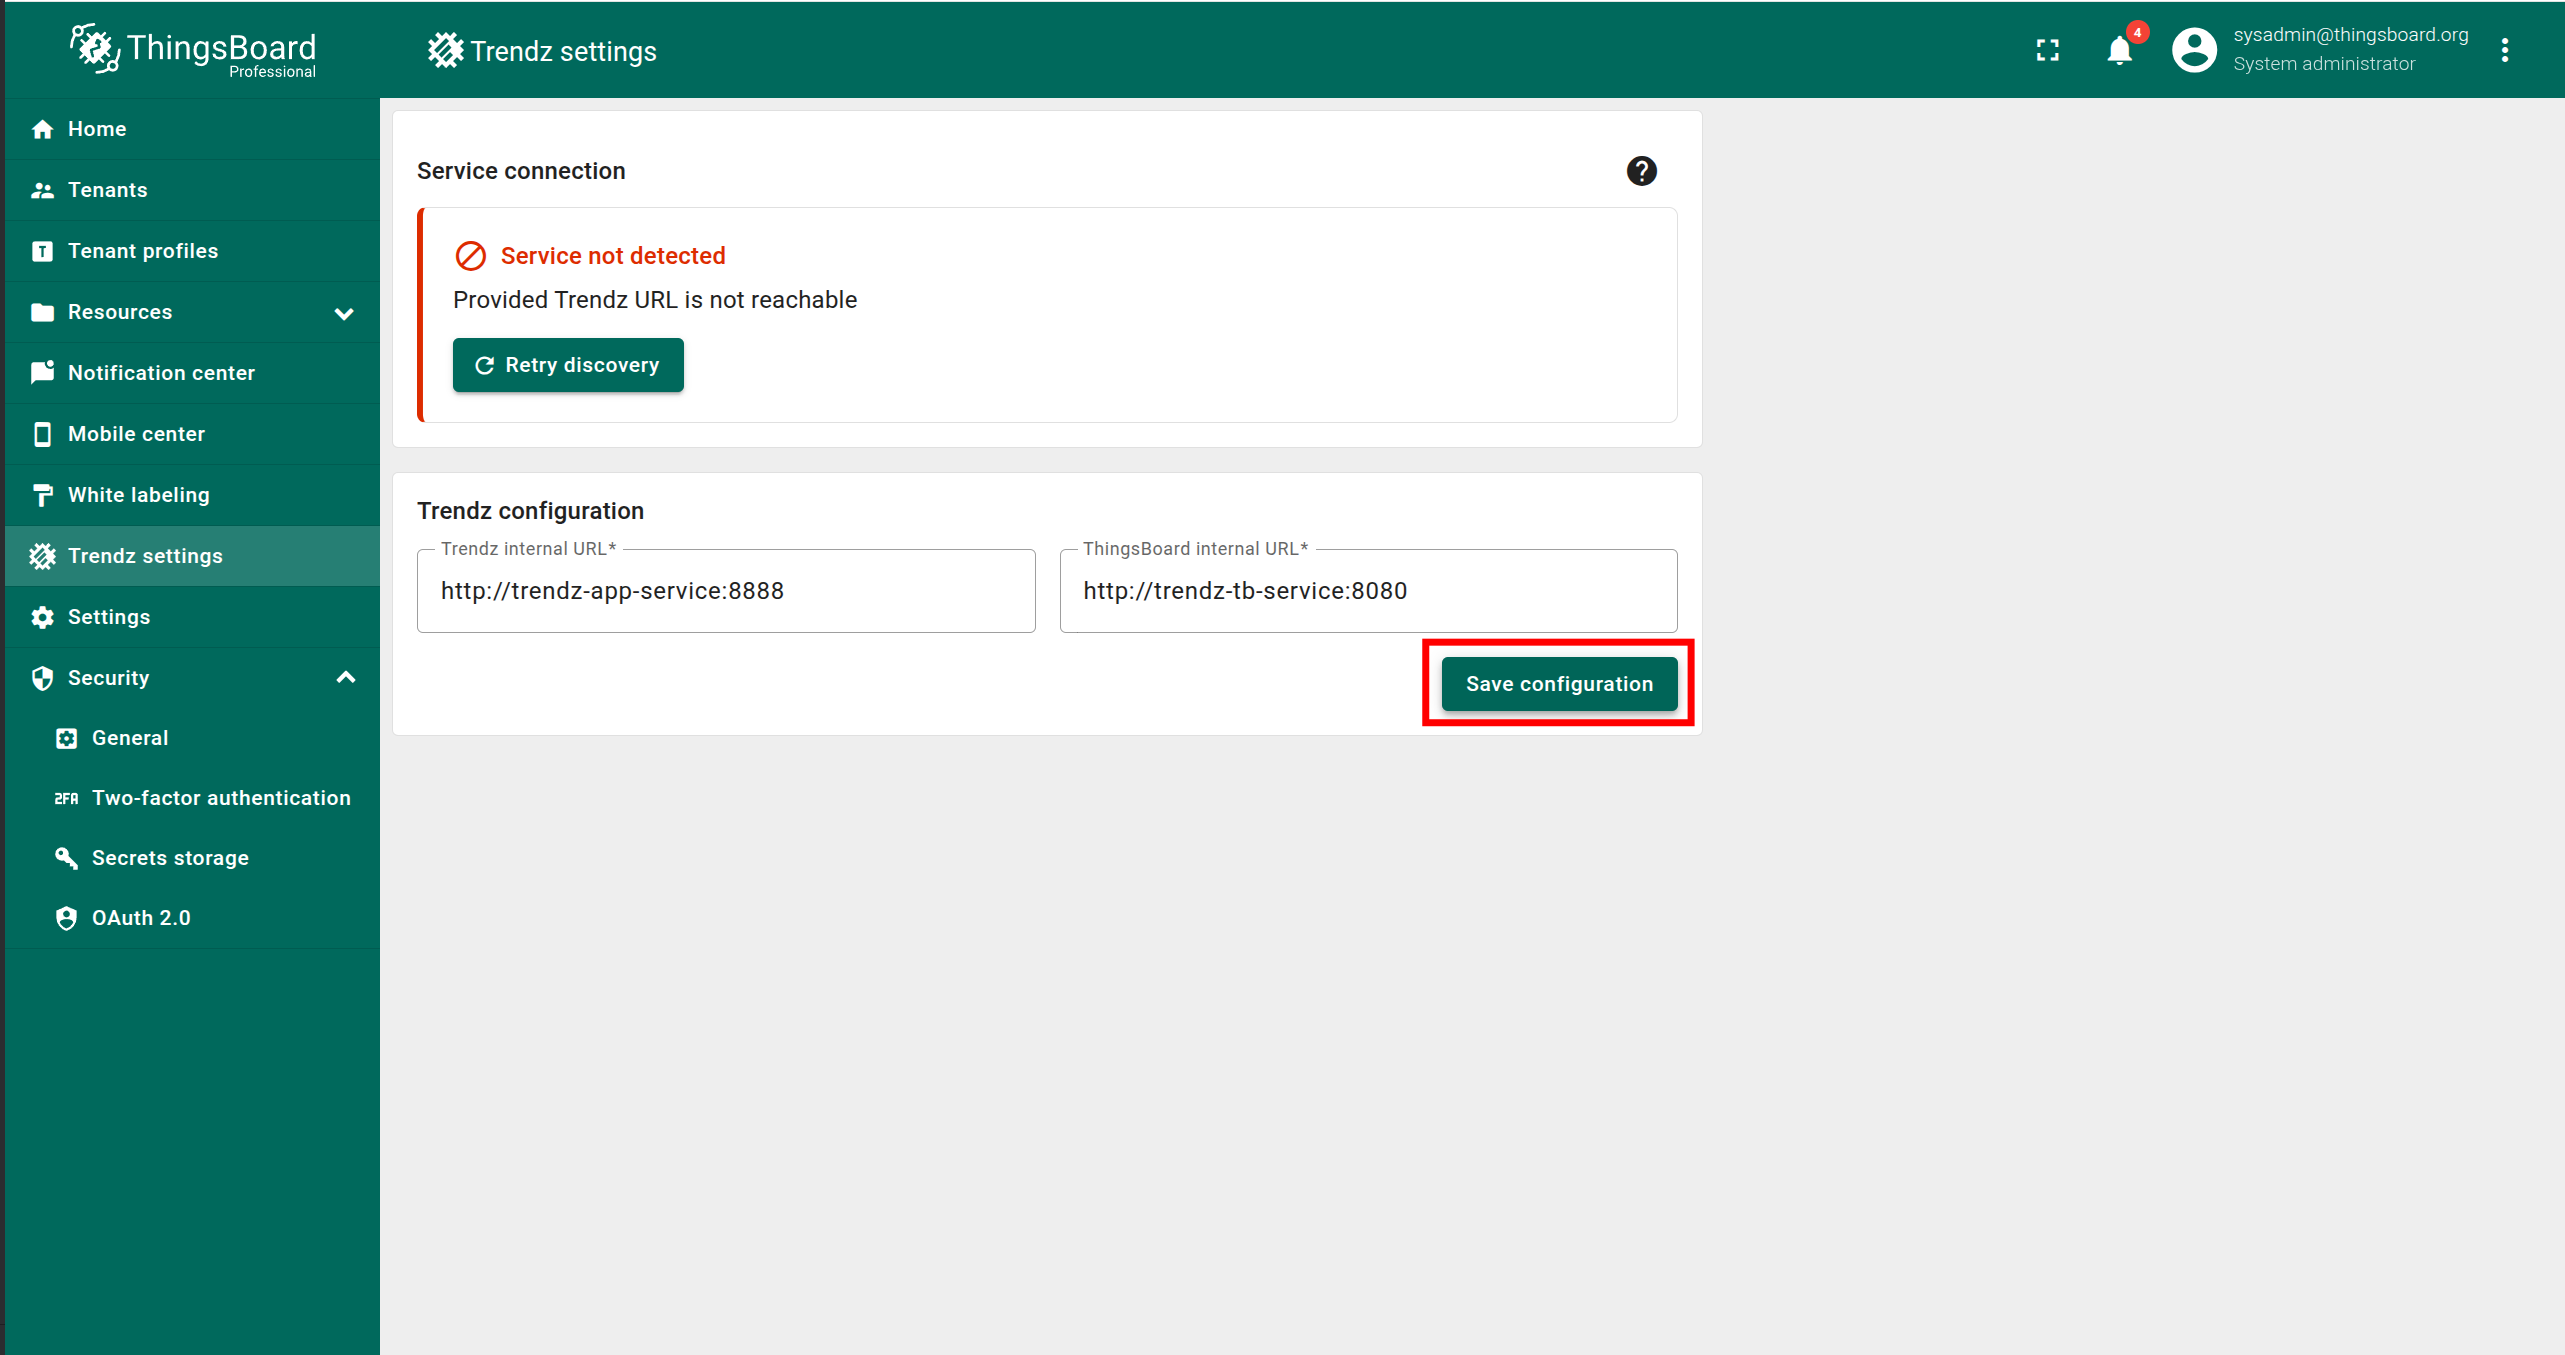
If you see an error message, follow these steps:
- Make sure that Trendz is running.
- Enter the correct Trendz internal URL. It must be accessible from the ThingsBoard service.
- Enter the correct ThingsBoard internal URL. It must be accessible from the Trendz service.
- Click Save configuration.
- Click Retry discovery.
Once the message “Synchronization completed successfully” appears, the synchronization is complete.


Step 7. Install Trendz Python Executor
To utilize all Trendz capabilities, such as Trendz Python Calculation Fields or Prediction Models, it is essential to install an additional service: the Trendz Python Executor, which can securely run Python code.
You can learn more about how to install it here.
Authentication
You can access Trendz UI by default at http://localhost:8888
Trendz uses ThingsBoard as an authentication service, so for first authentication, you need to use Tenant Administrator credentials from your ThingsBoard.
Topology Discovery
After the first login to Trendz, you need to discover topology to allow Trendz to know about assets, devices, their profiles and relations:
- Click the Discover Topology button to start topology discovery process.
- Wait until your topology will be discovered.
- Click the Finish button to close topology discovery page and unlock the main Trendz functionality.
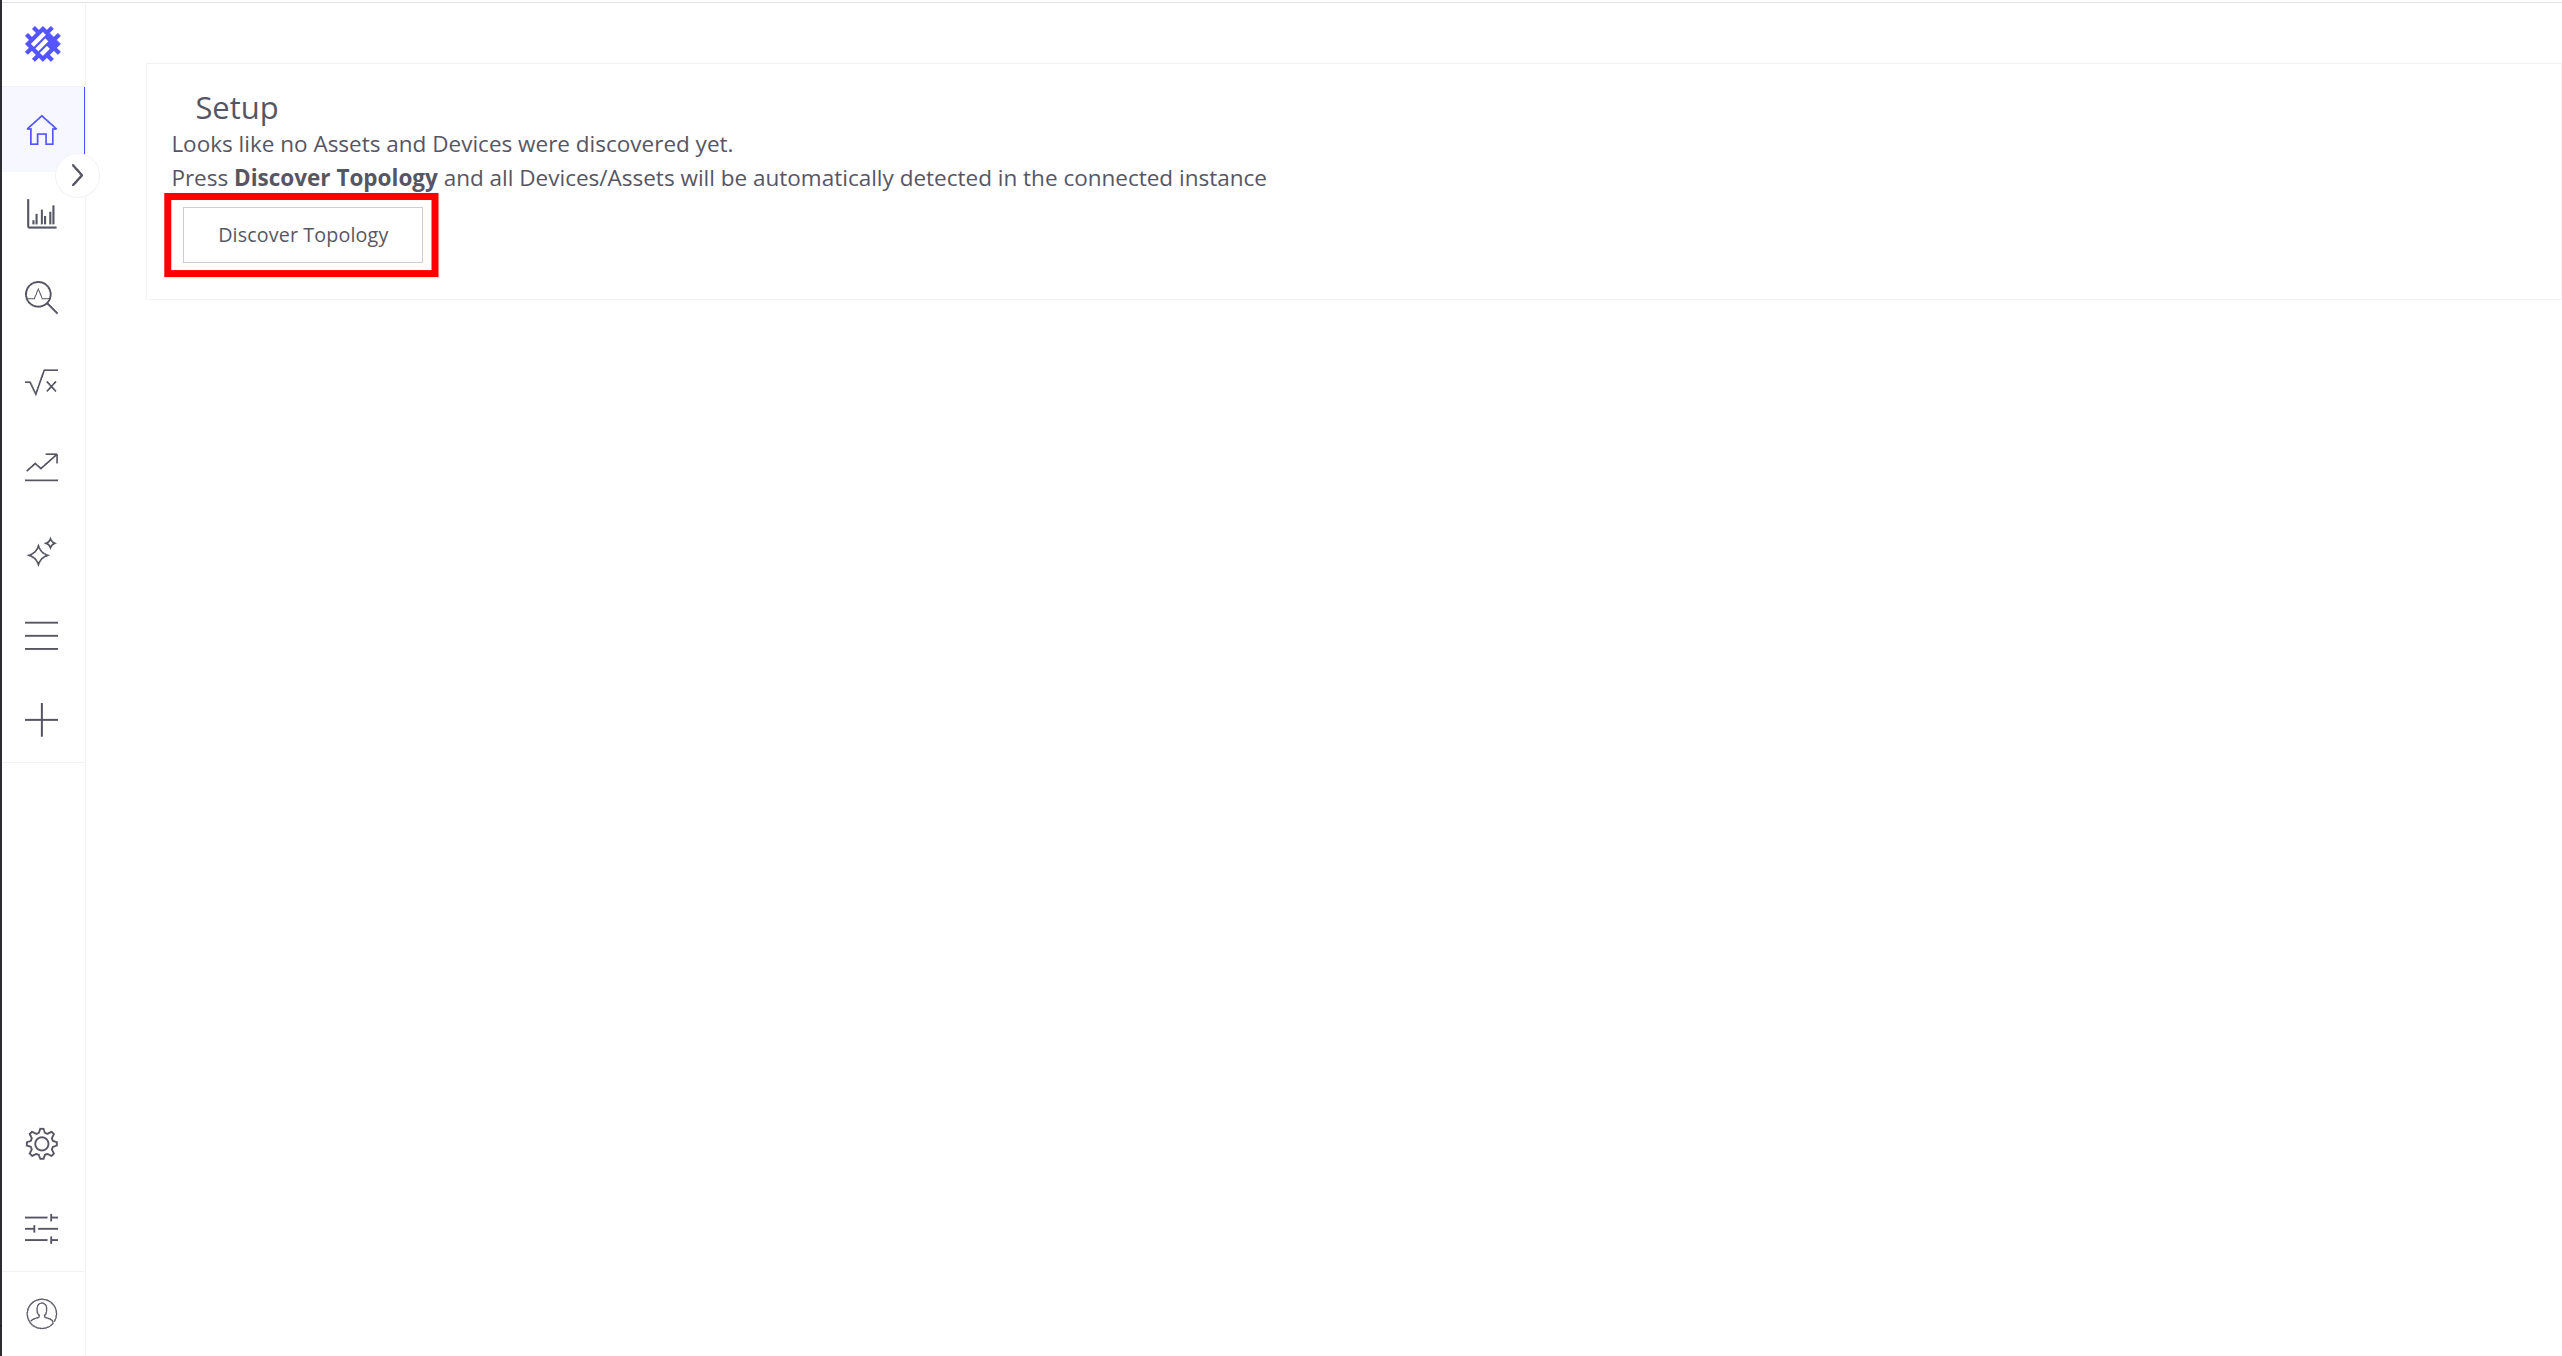
Click the Discover Topology button to start topology discovery process.
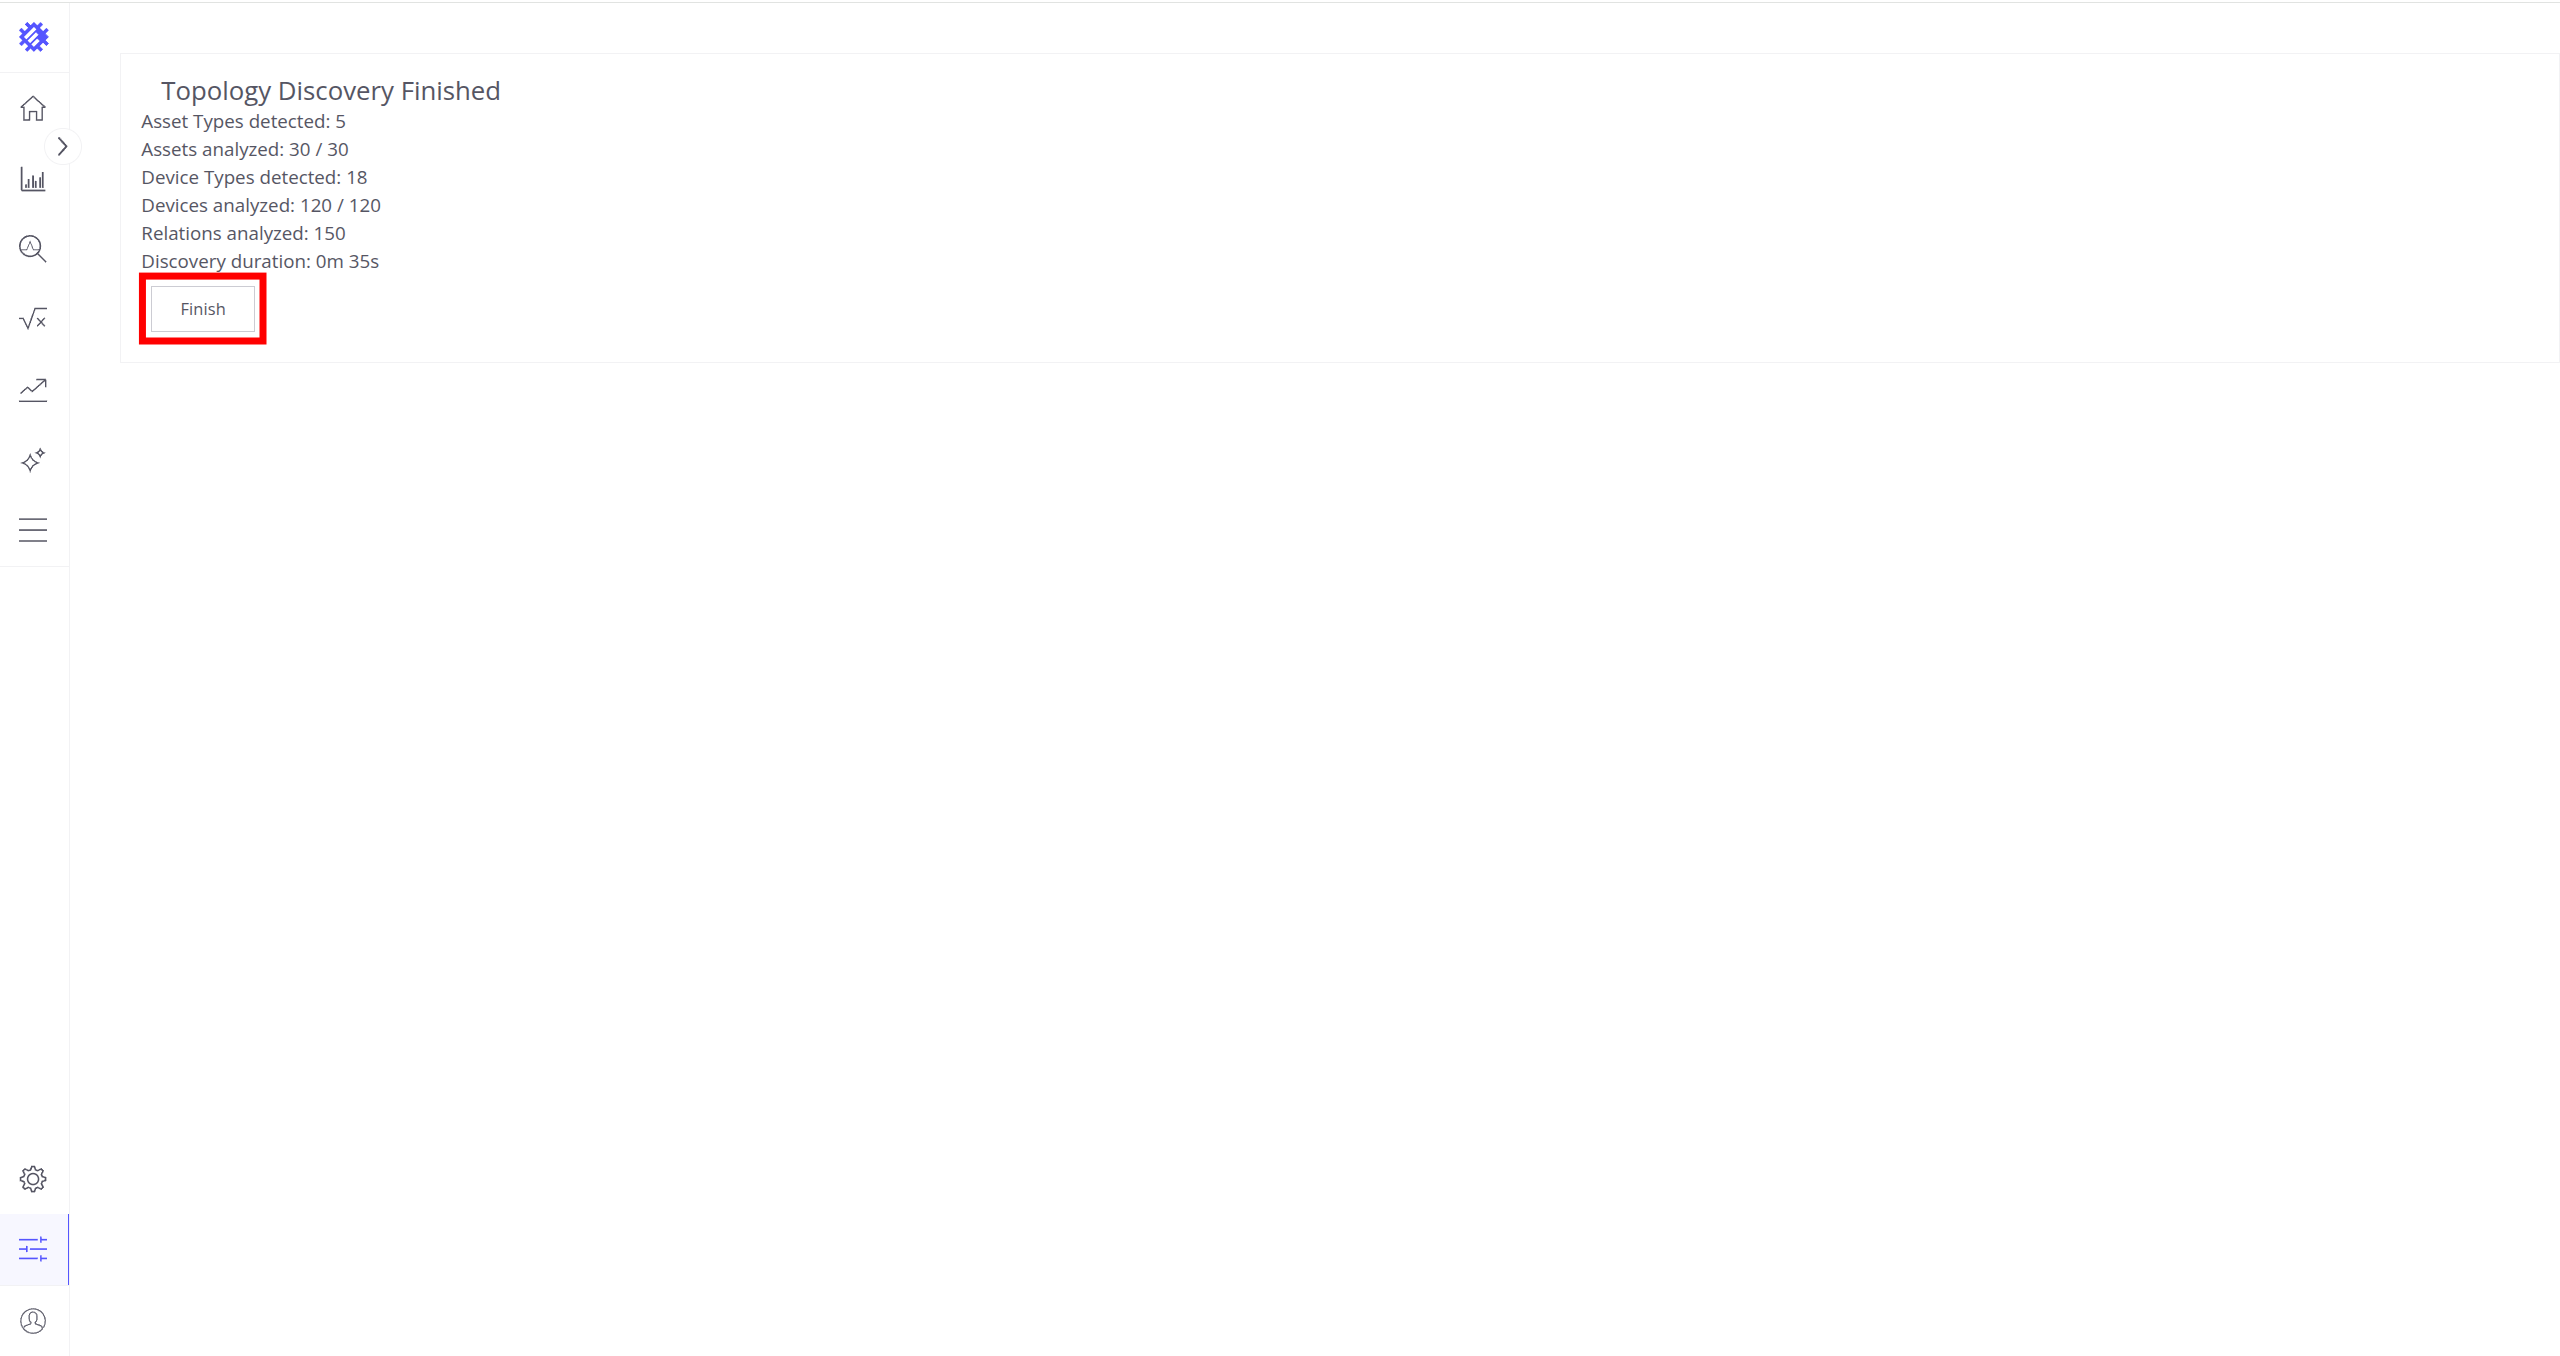
Click the Finish button to close topology discovery page and unlock the main Trendz functionality.
You could read more about how Trendz uses this topology here.
Troubleshooting
The log files are located in logs folder (“C:\Program Files (x86)\trendz\logs” in our case).
The trendz.log file should contain following line:
1
YYYY-MM-DD HH:mm:ss,sss [main] INFO  o.t.t.TrendzApplication - Started TrendzApplication in x.xxx seconds (JVM running for x.xxx)
In case of any unclear errors, use general troubleshooting guide or contact us.
Windows firewall settings
In order to have external access to Trendz Web UI you need to create a new inbound rule with Windows Firewall with Advanced Security.
- Open “Windows Firewall” from “Control Panel”:

- Click “Advanced settings” on the left panel:

- Select “Inbound Rules” on the left panel, then click “New Rule…” on the right “Actions” panel:

- Now new “New Inbound Rule Wizard” window will open. On the first step “Rule Type” select “Port” option:

- On the “Protocol and Ports” step select “TCP” protocol and enter port 8888 in the “Specific local ports” field:

- On the “Action” step leave “Allow the connection” option selected:

- On the “Profile” step select Windows network profiles when to apply this rule:

- Finally, give the name to this rule (for ex. “Trendz Service Networking”) and click “Finish”.

Next steps
-
Getting started guide - These guide provide quick overview of main Trendz features.
-
Metric Explorer - Learn how to explore and create new metrics with Trendz Metric Explorer.
-
Anomaly Detection - Learn how to identify anomalies in the data.
-
Calculated Fields - Learn about Calculated fields and how to use them.
-
States - Learn how to define and analyse states for assets based on raw telemetry.
-
Prediction - Learn how to make forecasts and predict telemetry behavior.
-
Filters - Learn how filter dataset during analysis.
-
Available Visualizations - Learn about visualization widgets available in Trendz and how to configure them.
-
Share and embed Visualizations - Learn how to add Trendz visualizations on ThingsBoard dashboard or 3rd party web pages.
-
AI Assistant - Learn how to utilize Trendz AI capabilities.